5.2. Interacting with the NetworkManager Applet
Users do not interact with the NetworkManager system service directly. Instead, you can perform network configuration tasks via NetworkManager's Notification Area applet. The applet has multiple states that serve as visual indicators for the type of connection you are currently using.
If you do not see the NetworkManager applet in the GNOME panel, and assuming that the NetworkManager package is installed on your system, you can start the applet by running the following command as a normal user (not root):
~]$ nm-applet &
After running this command, the applet will appear in your Notification Area. You can ensure that the applet runs each time you log in by clicking → → , and, in the Startup Programs tab of the Startup Applications Preferences window, checking the box next to NetworkManager.
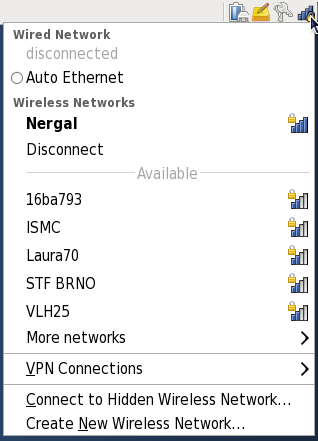
When you left-click on the applet, you are presented with a list of Wired, Wireless and Available Networks, and options for connecting to any configured Virtual Private Networks (VPNs), or to hidden or new wireless networks. When the number of available networks is long (as when there are many wireless access points in the area), the More networks expandable menu entry appears. If you are connected to a network, its name is presented in bold typeface under its network type, such as Wired or Wireless.
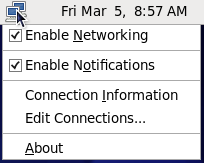
Next, right-click on the NetworkManager applet to open its context menu, which is the main point of entry for interacting with NetworkManager to configure the network.
Ensure that the Enable Networking box is checked; if the system has detected a wireless card, then you will also see an Enable Wireless menu option, which you should check as well. NetworkManager notifies you of network connection status changes if you check the Enable Notifications box. Clicking the Connection Information entry presents an informative Connection Information window that lists the connection type and interface, your IP address and routing details, and so on. Useful network information is always two clicks away.
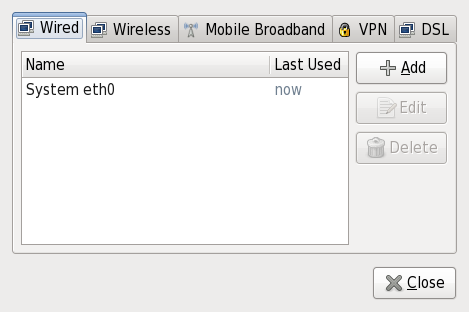
Finally, clicking on Edit Connections opens the Network Connections window, from where you can perform most of your network configuration tasks. Note that this window can also be opened by running, as a normal user:
~]$ nm-connection-editor &
5.2.1. System and User Connections
NetworkManager allows users to modify network connections so that they are user connections or system connections. Users may or may not need root privileges to create and modify system connections; this is determined by the system-specific policy that the administrator has configured. NetworkManager's default policy enables users to create and modify user connections, but requires them to have root privileges to add, modify or delete system connections.
User connections are so called because they are specific to the user who creates them. In contrast to system connections, whose configurations are stored under the /etc/sysconfig/networking/ directory (mainly in ifcfg-<network_type> interface configuration files), user connection settings are stored in GConf and the GNOME keyring, and are available only during login sessions for the user who created them. Thus, logging out of the desktop session causes user-specific connections to become unavailable. Because of this property, users may wish to configure VPN connections as user connections for security purposes.
System connections, on the other hand, become available at boot time and can be used without logging in to a desktop session.
NetworkManager can quickly and conveniently convert user to system connections and vice versa. Converting a user connection to a system connection causes NetworkManager to create the relevant interface configuration files under the /etc/sysconfig/networking/ directory, and to delete the GConf settings from the user's session. Conversely, converting a system to a user-specific connection causes NetworkManager to remove the system-wide configuration files and create the corresponding GConf/GNOME keyring settings.
When editing a connection from the Network Connections window, checking the Available to all users checkbox at the bottom of the Editing connection_name window and clicking Apply will make it a sysem connection. Unchecking that checkbox will make it a user connection. Depending on the aforementioned policy setting, NetworkManager may invoke PolicyKit to ensure you have the appropriate privileges, in which case you will be prompted for the root password.


